6 easy steps to build your own hydroponic system with pvc pipes
Today we learn how to build an advanced hydroponic system in 7 steps. At the end, you also get a shopping list of everything you need to build the system. If you feel like you’re more of a beginner and want to start with a simpler system, you can also check out this guide to building a deep-sea farming system. In this article we build a nutrient film technique system. It is a good system for beginners and advanced ones as well, it also gives the possibility to automate hydroponics easily and it is a good system for hydroponics at home. With this system you can easily apply hydroponics outdoors.
We will build the system in 6 steps:
- Installation of PVC pipes
- Construction of the system structure.
- Deposit Configuration
- transplant seedlings
- Prepare nutrient solution and stopwatch
- Let the hydroponic system work
Let us begin!
Step 1: Setting up PVC pipes
The first step of the system is to drill holes in the pvc pipes to hold the net cups. This can be done using a simple drill. Most of the netcups we know of are conical, so their top diameter is larger than the bottom. This is a good prerequisite for drilling holes that will hold the net cup and immerse most of it in the pvc pipe without the net cup falling in. Of course you have to find the correct size of netcups for the correct size of pipe. the goal should be for the net cup to be able to hang completely on the pipe without leaving too much space between the bottom of the cup and the pipe. Keep in mind that later on, you’ll want your netcup to get wet from the flow of water, at least for the first few weeks of growth. Later the water level can be lowered. For our latest system, we used net cups that are a total of 68mm (2.7 inches) in height for a pvc pipe with a diameter of 90mm (3.5 inches). Another important factor is the distance of the cups. It is important that the plants have space next to each other in order to grow properly. This also depends on the type of plant. If you have short but wide plants, you may need more space between them than if you plan to plant long plants. Also important if you drill the holes and calculate the distances, keep in mind that you need to close the tube at its ends, and the necessary muffle also takes up space, so before planning your holes, measure what space is left when the muffle is on.
Here are some measurements from our latest system:
- For a 90 mm (3.5 in) diameter pvc pipe
- We use netcups with a height of 65 mm (2.7 in)
- And put 7 cups in 1 meter (39 inches) of pipe
- we plan with plants that don’t need too much space, and we would rather make fewer netcups per 1 meter than 7.

The next step is to put the Caps/muffles for the pvc tube, the muffles are usually glued and the glue usually takes about 24 hours to dry. Of course, you need to take the fitting caps for the pipe. Make sure the glue is waterproof and also suitable for drinking water. Even if your nutrient solution isn’t drinking water, you plan on eating your crop in the end. Of course, the same is true for the pvc pipes themselves.

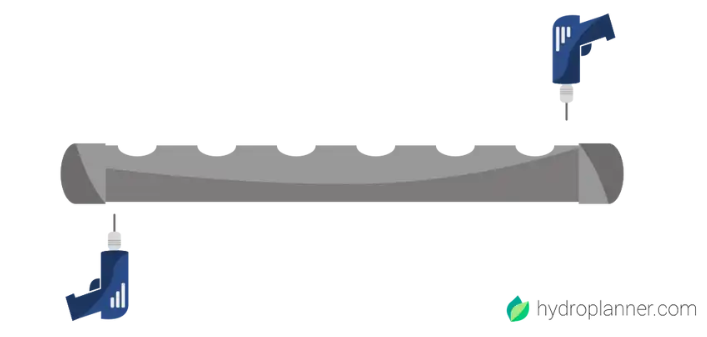
To finish the pvc pipes, you also need to drill inlet and outlet holes for the hoses. the inlet hole is at the top of the pipe, where the holes for the net cups are, while the outlet is at the bottom. Make sure the outlet hole fits the used hose exactly, if not you also need to seal the tubing and hose connection so you don’t lose nutrient solution, but it’s also very helpful if you can change how high a hose sticks out . in the pipeline. You can use this to adjust the water level in the pipe later. In our system, the first inlet from the pump to the first PVC pipe is a hose smaller than all connecting hoses in the pipe, this is a safety precaution to make it more difficult to flood the pipe and lose solution. nutrients. Your hole should incorporate the correct size of the hoses you are using, also because you may want to adjust the precise height of the hoses within the pipe later.
Pro Tip: If you can buy white pipes you should, if you can’t get white once we recommend painting them white. This helps keep the interior cool, most of the piping is black which can speed up heating all the roots which could damage them.
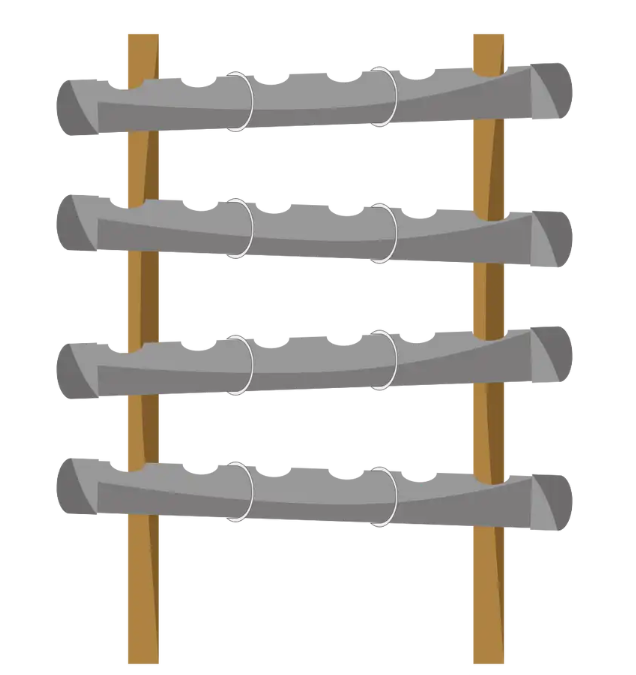
Step 2: Build the framework for the system
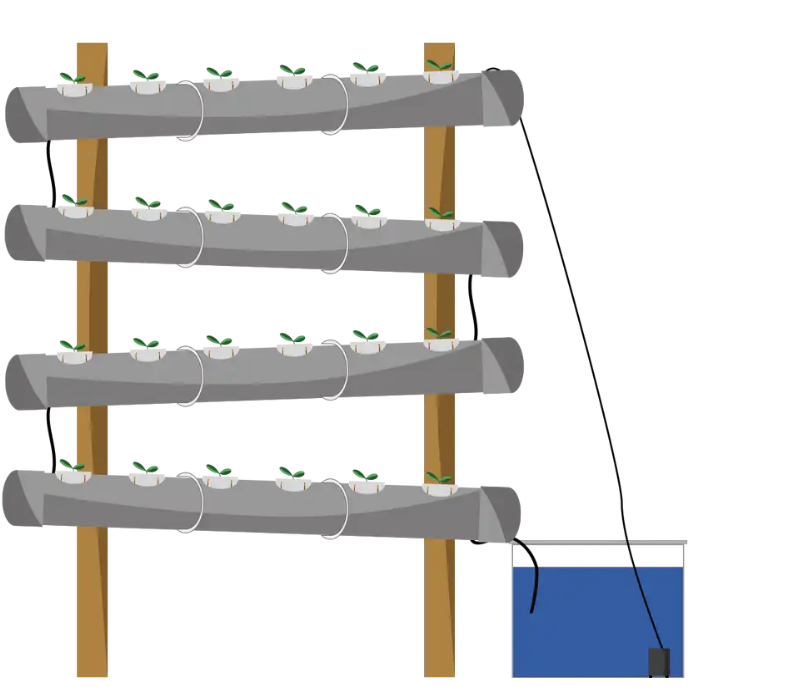
Once you’re done with the pipes, you want to start with the overall structure that makes up your system. In our example, we propose to build a ladder as a shelf, which is easy to build and you can lean it against a wall and have both vertical and horizontal clearance.
Step 2.1: Build a Wooden Pipe Shelf
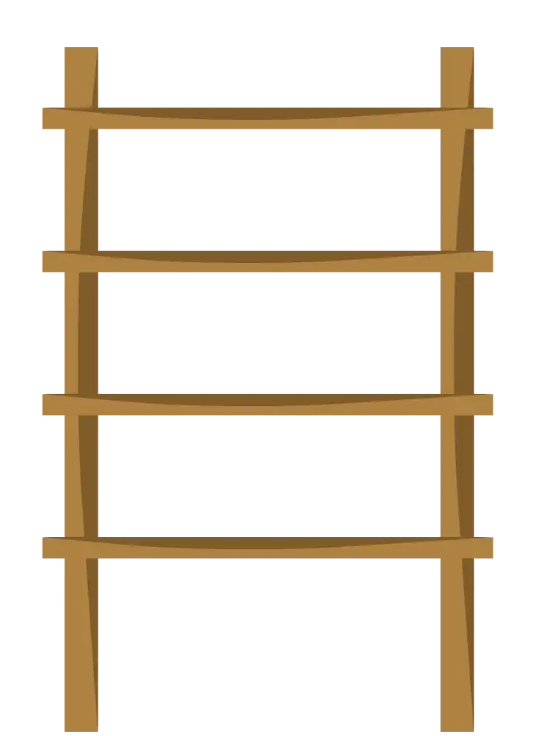
There are different possible constructions. You can use a ladder-like structure as the proposal that you can easily lean against a wall. You can also create something like a pyramid, which is free-standing and can have pipes on both sides of the pyramid, giving you more room to grow. Every imaginable structure you can build follows certain requirements:
1. Distance between pipes
Leave some distance between the horizontal and vertical tubes, your plants need space to grow and you give it to them. Unlike a typical farming/gardening technique, you can build your system vertically, which already gives you much more space. But the kind of hydroponic system we’re building here is also easily adaptable to be laid out both horizontally and vertically. In our example we mainly used a vertical space and through the stair shape also some horizontal distance between the floors. This, of course, ultimately depends on the type of plants you want to grow. Do you want to grow tomatoes that grow tall, or just salad that runs small?
2. Build the structure to support the weight
The system will have pvc pipes, and those pipes will contain the plant, the roots, the growing medium and the water. All this can get quite heavy, depending on the plants and the growing medium and the length of the pipe. Also, if there is water left in the pipe, this could be heavier. So build your structure to support those loads. Also, you want to scale later, so plan for a rack that supports scaling and also supports the new loads. At first, you’ll want to ask yourself how many pipes you want to start with, but also how many you want to connect later.
3. The deposit must be the lowest point
To create a natural water outlet from your system to the reservoir, it is important that the reservoir is lower than the lowest pipe. So you can’t start at ground level with your first pipe if you can’t dig the reservoir into the ground. Also, if you plan to scale your deposit at a later point, this should be reflected in your structure.
Step 2.2: Attach the PVC pipes to the frame
This is pretty straight forward, now you have the pipes and the rack, now you need to connect the pipes to the rack. The easiest way is to use pipe clamps which are attached to the frame and then the pipes are attached to the pipe clamps.

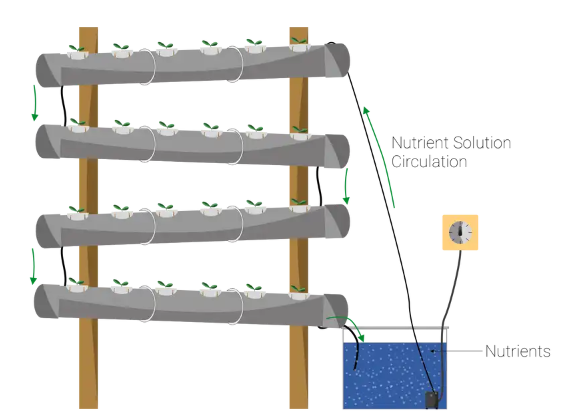
There is only one thing to keep in mind when doing this: since you want the water to flow throughout the system, you need to position the clamps in a way that creates an angle for the pipes. In general, the water should flow in a zick-zack fashion through the system. The size of the angle depends on one thing: Do you want to have a natural flow of water, or do you also want the pipes to contain water all the time, regardless of the flow? If you want to have your pump running all the time one flow is enough so you need to add more angle, if you also want to combine the system with the idea of a backflow system you can increase the water level using the hoses and so So you may not need as much angle at all.
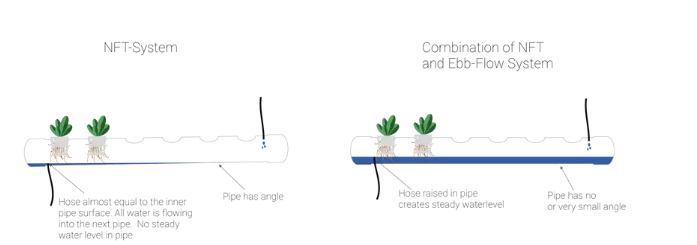
Our recommendation is to have a small angle and raise the hoses into the pipe to create a constant water level within the pipes. This prevents root burn damage on hot days and also saves energy because the pump does not have to be running all the time.
If you have decided what angle you want for your system, you can connect the pipes to the frame
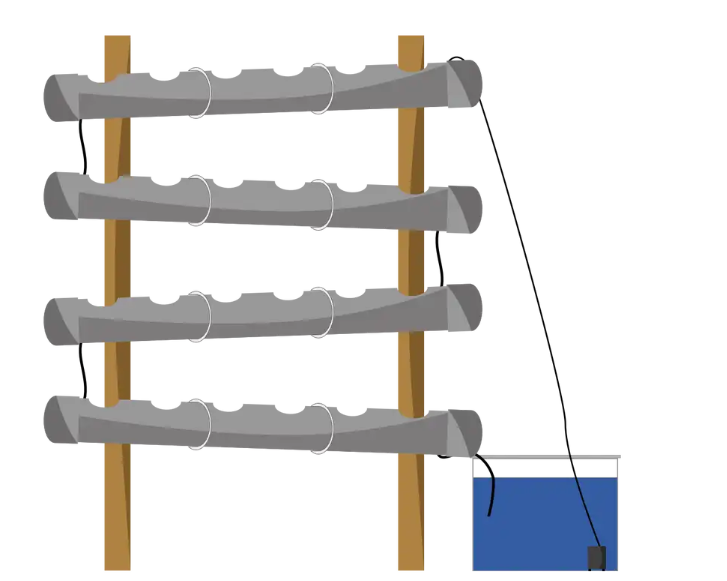
Step 3: Deposit setup
After building the pipes and the structure. Now it’s time to talk about the reservoir itself. The reservoir is one of the things that is more or less the same for many different hydroponic systems. You need a container that doesn’t let light in, to prevent algae growth, it also needs to be large to hold enough water to keep the system running for a while, and you need a submersible pump that is capable of pumping the water to the height of the entry point into your system. If you create a system 2 meters high, your pump must have enough power to be able to pump that distance.

After setting up the reservoir, we can now take care of all the hoses within the system. Create a zick-zack flow to really get the water flowing and avoid standing water. Water flow is very important to your system, as splashing from falling water also supplies oxygen to your system. Also as explained before, place the hoses a little higher to create a constant level of water in the pipes.
Now, as we already covered in the previous steps, when connecting the pump to the system itself, we strongly recommend using an inlet hose that is thinner than all of the outlet or bypass hoses. This is a natural deterrent to overflows. However, it does not guarantee an overflow situation, it might help to mitigate it.
Step 4 – Transplanting the Seedlings
So now your system is set up and all you need are some plants to grow on it. All of the above steps need to be done just once, while the following steps can be repeated every season or whenever you add new plants to your system.
One of the most frequently asked questions is “When to transplant the seedlings?”. Essentially, there is a simple answer: after transplanting the seedling, you should be able to reach the nutrient solution in your new system. So depending on how your system works, it all comes down to the length of the root developed in the seedling phase.
“When to transplant seedlings?”
You can transplant the seedling as soon as it has a root long enough for it to reach water through the growing medium and net cup.
In addition to the seedling, you also need a growing medium and clay pebbles to transplant your seedlings. You can of course use and experiment with a wide variety of growing media. We had a good experience with the sponges, because you can also make them with a cut on the inside which helps to transplant the seedlings, because you can easily wrap the medium around the root. Also, your plant shouldn’t be too low in the netcup and sometimes you don’t have much medium, so you can fill the netcup with pebbles which also absorb and save nutrient solution. After combining the seedling, medium, clay pebbles, and netcup, you’re ready to pipe them.
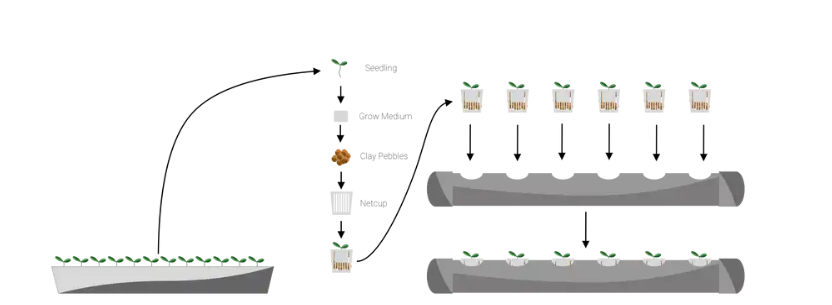
After transplanting your seedlings, you can assemble the whole system, so now you have everything from the frame, the pipes, the reservoir, and also the seedlings.
Step 5 – Prepare the Nutrient Solution and Timer
Now is the time to take care of the feeding of your plants. As we learned in a previous post, the two essential metrics for a hydroponic system are pH and TDS. To find out which values apply to the plants in your system, use the Hydroplanner, which helps you derive those values for your plants. If you have planned your system accordingly, you know what values to aim for. So now your reservoir and the nutrient solution it contains should reflect those values. To do this, first use hydroponic fertilizer to establish the correct TDS value and then use a pH meter to measure the pH of your solution and adjust using pH Down or pH to the desired level.
Once you finish your nutrient solution, check the pH and TDS regularly. It is vital for the growth of your plants that these values are aligned with your preferences.
Now, in addition to the nutrient solution itself, you also need to manage the proper flow of the solution into your system. The easiest way to do this is a timer that turns the pump on and off.
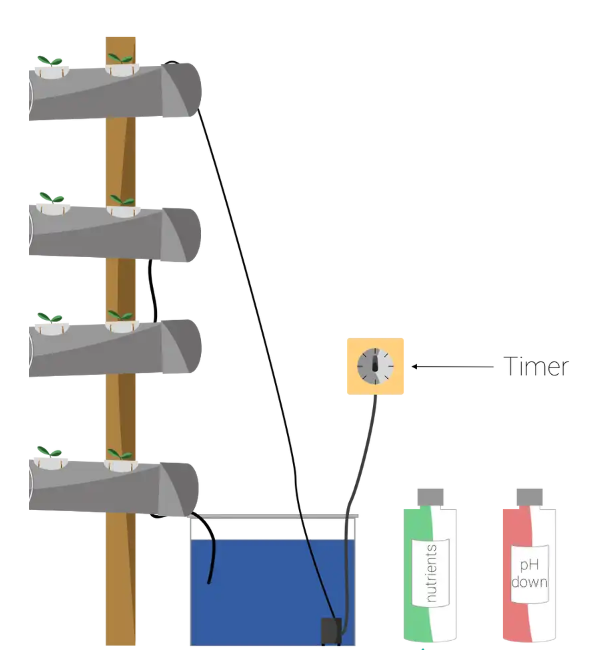
We recommend short intervals with short pump durations to avoid overflow. Plants will grow larger roots that may clog hoses. This is not easy to prevent, so if you pump frequently for a short period of time, the water may still be able to flow completely through your system. Explicitly speaking, pumping for 2 minutes every 20 minutes can be a good starting point to supply your plants with enough nutrients and avoid overflow and water loss. This also depends on the size of your system.
Step 6: Let the hydroponic system work
Now you have completed all the steps and your system is complete, you can start growing all kinds of different plants, vegetables, herbs and fruits. Let the system run, experiment with different plants, growing media, structures, pipes, sizes, etc. Start growing and start learning. Also check your vital signs regularly to maximize the performance and happiness of your plants.
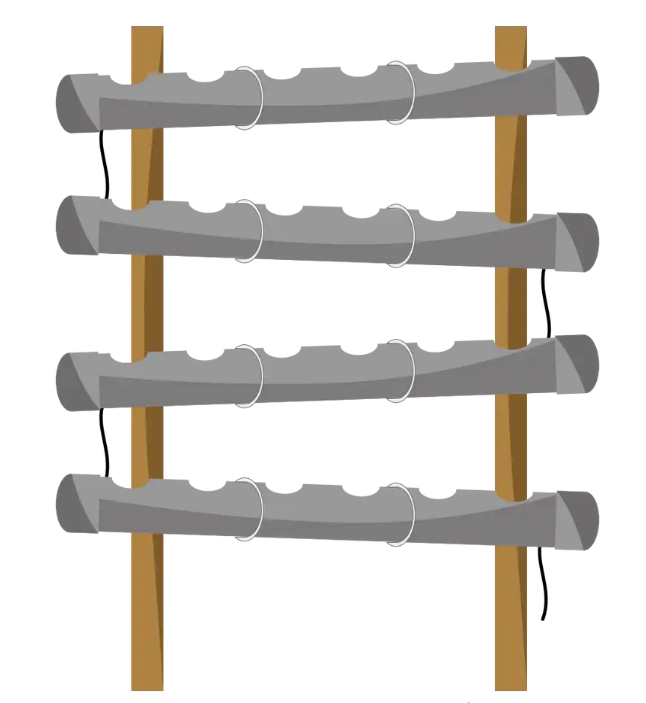
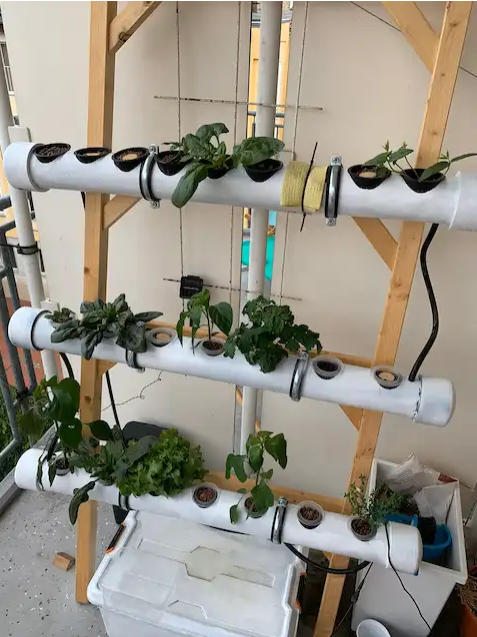
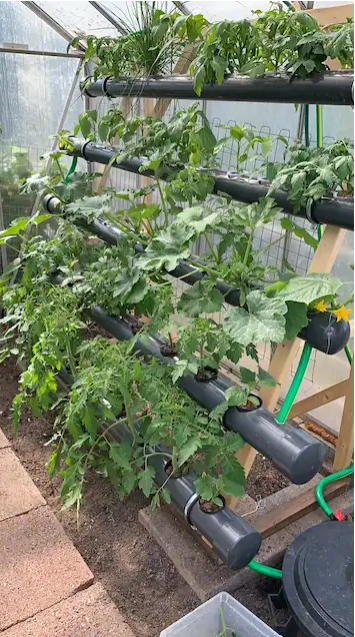
Here are also 2 photos of our system that we built following this guide
Shopping list
This was a long DIY guide to building this system, we want to give you a list of all the things that came up here so you have a starting point to start shopping for all that stuff. Throughout this guide we have used the following materials and things:
- Hole – Drill
- PVC pipes
- PVC pipe caps with glue
- Shelf of wood
- Clamps
- Reservoir – opaque container with lid
- Submersible pump
- Thin hose
- Thick hose
- Net cups
- Growth medium
- Clay pebbles
- Timer
- Nutrients / Hydroponic Fertilizer
- pH down/ph up